Tips & Tricks
Determination of the Specific Heat by Means of LFA
In this method, the bottom surface of a sample is heated by a light flash (lamp) or a short laser pulse and the resulting temperature rise on the top surface of the sample is measured using an infrared detector.
This method was introduced in 1961 by Parker et al. and was initially limited to isotropic materials and AdiabatiqueAdiabatic describes a system or measurement mode without any heat exchange with the surroundings. This mode can be realized using a calorimeter device according to the method of accelerating rate calorimetry (ARC). The main purpose of such a device is to study scenarios and thermal runaway reactions. A short description of the adiabatic mode is “no heat in – no heat out”.adiabatic conditions, i.e. no heat exchange with the environment was taken into account.
Over the years, however, mathematic models for adjusting experimental data have been refined and factors like heat loss, pulse length effects, etc. have been included. The laser or light flash analysis has thus become a worldwide method of choice for determination of Diffusivité ThermiqueThermal diffusivity (a with the unit mm2/s) is a material-specific property for characterizing unsteady heat conduction. This value describes how quickly a material reacts to a change in temperature.thermal diffusivity and conductivity.
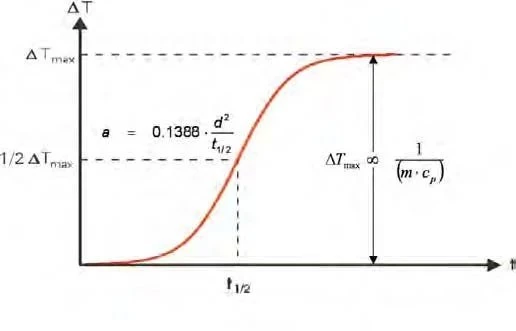
It is a discontinuous measuring technique which heats to defined temperature steps and then holds the temperature constant. After temperature stabilization, three to five measurements are generally carried out. The temperature increase on the top surface of the sample is relatively low and normally amounts to less than 1 K. To calculate the thermal diffusivity, the half time t1/2 (time corresponding to half the step height) is used. The absolute temperature increase (step height) can be used to determine the specific heat. It is indirectly proportional to the heat capacity of the sample.

The method for determining the specific heat with LFA measurements is described in detail in ASTM E1461-07, Annex X2. One of the main requirements for this standard is the use of a reference material with a known specific heat value. The cp of an unknown material can be calculated by comparing the signal heights between sample and reference (see formula).
The method for determining the specific heat with LFA measurements is described in detail in ASTM E1461-07, Annex X2. One of the main requirements for this standard is the use of a reference material with a known specific heat value. The cp of an unknown material can be calculated by comparing the signal heights between sample and reference (see formula).

- T: height of the detector signals
- Q: Pulse energy
- Gain: Amplification gain for the thermal rise
- ρ: density
- L: Specimen’s thickness
- R: Specimen’s radius
As of yet, there are no certified standard materials of proper size (12.7 mm in diameter) available for this purpose on the market. The ASTM standard therefore lists several industry-accepted reference materials for studying thermal diffusivity in Annex X3, such as electrolytic iron and POCO graphite (AXM -5QA), which are distributed by NIST as Conductivité ThermiqueThermal conductivity (λ with the unit W/(m•K)) describes the transport of energy – in the form of heat – through a body of mass as the result of a temperature gradient (see fig. 1). According to the second law of thermodynamics, heat always flows in the direction of the lower temperature.thermal conductivity standards.
NETZSCH offers you the following reference materials, tailored to various temperature and thermal diffusivity ranges:
- POCO graphite,
- Al2O3,
- Pyroceram 9606,
- Electrolytic iron,
- Stainless steel (SRM 1461),
- aluminum,
- Pyrex and
- Copper.
For accurate comparability of the absolute step heights (temperature increases on the sample surface), identical experimental parameters for sample and reference measurements are recommended.
Special attention must be paid to the emissivity of the surface as well as to the area to be analyzed. Consistent emissivity can be guaranteed by coating as uniformly as possible with graphite. The area to be analyzed corresponds to the diameter of the opening in the cover plate. Even if the sizes or geometries of the sample and reference otherwise differ, the diameters of the cover plates must match.
For the LFA 447 NanoFlash®, the amount of space between the material surface and the detector must also be taken into consideration. If the sample is considerably thinner than the reference material, for example, the sample should be positioned accordingly higher by means of a ring or similar support.
As with cp determination by means of DSC, it is advisable to carry out the sample and reference measurements either simultaneously or in immediate succession. For compact solids, a cp accuracy of +/- 5-7% or better can be achieved (depending on the sample preparation). This method is not suitable for pastes, powders, liquids or inhomogeneous samples.

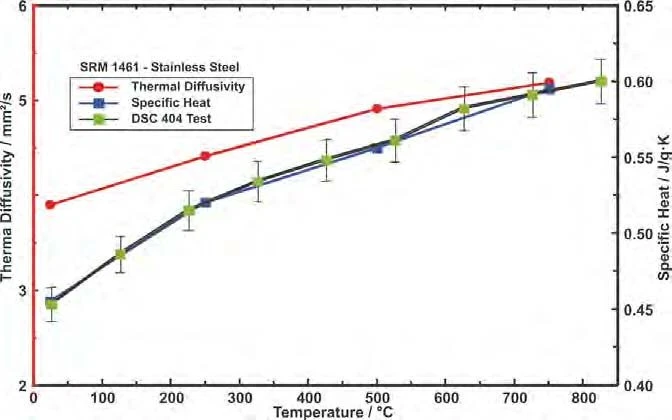
The figure below depicts the cp data of stainless steel (standard reference material SRM 1461 for thermal conductivity) achieved with LFA measurements in comparison with the specific heat values resulting from a DSC investigation. The deviation of the data is considerably lower than the error bars indicated, which represent +/- 3% .